
The Power of Activity: A Lesson in Pressure
The Power of Activity: A Lesson in Pressure
Every chess game is a conversation between two players. In this game, White shows us how to use active pieces to create a powerful attack. Let’s follow the journey of the pieces as they move across the board.
The Opening Battle
White begins with 1. d4. This move claims space in the center and opens a path for the Queen and Bishop. Black replies with 1... Nf6, a flexible move that develops a piece and stops White from placing another pawn in the center immediately. White continues with 2. Nf3, bringing out a Knight toward the middle. Black plays 2... g6, preparing to place the Bishop on a long diagonal where it can watch the whole board.
White develops the Bishop to a sneaky square with 3. Bg5. This puts pressure on Black’s Knight. Black follows the plan with 3... Bg7, creating a strong "fianchetto" house for the Bishop. White brings out the second Knight with 4. Nbd2. By placing the Knight here, White keeps the path clear for the pawns to move forward later. Black finishes the first goal of the opening by playing 4... O-O, putting the King into a safe castle.
Fighting for the Center
White now plays 5. e4, taking control of the very center of the board. Black fights back immediately with 5... d5. This challenges White's pawn and asks a question: will White move forward or take? White decides to trade with 6. exd5. Black brings the Queen out early with 6... Qxd5 to recapture. Usually, it is risky to bring the Queen out so soon, and White shows why by playing 7. Bc4. This move develops a piece and attacks the Black Queen at the same time.
Black moves the Queen to safety with 7... Qd6. White finishes development on the Kingside with 8. O-O. Now both Kings are tucked away. Black plays 8... a6, preparing to expand on the other side of the board. White plays 9. c3, building a solid wall of pawns to support the center.
Expanding the Horizons
Black continues the plan with 9... b5, attacking White’s Bishop and gaining space. The Bishop retreats to a good square with 10. Bd3. Black brings the final minor piece into the game with 10... Bb7. Both sides have developed their pieces well. White now tries to break open the side of the board with 11. a4. Black pushes past with 11... b4, refusing to let the lines open easily.
White finds a very active square for the Knight: 12. Nc4. Once again, the Black Queen is under fire and must move. She goes to 12... Qd5. White brings the Rook to the center with 13. Re1. This Rook is now looking directly at Black’s center pawns. Black develops the last Knight with 13... Nc6.
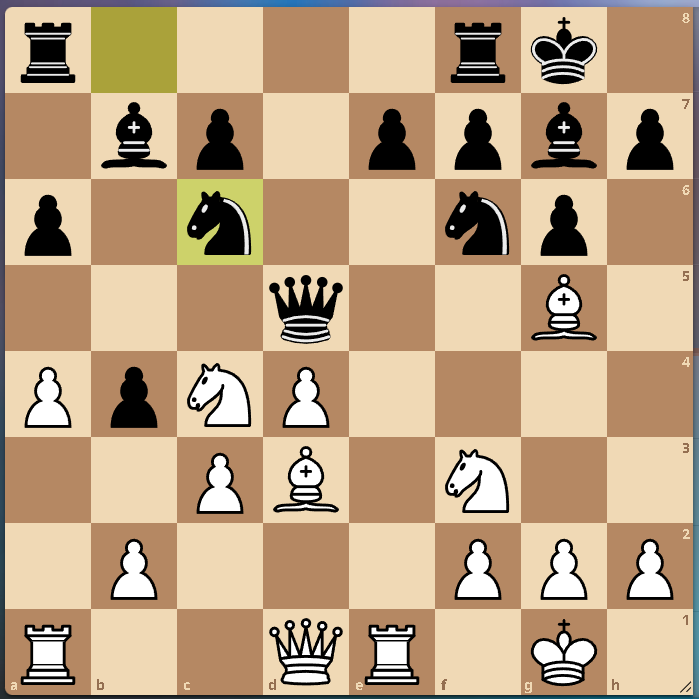
Diagram 1 – The Attack Begins
The Attack Begins
White centralizes the Queen with 14. Qe2, lining up behind the Knight. Black moves the Rook to 14... Rfe8 to protect the center. White decides it is time to leap forward with 15. Nce5. This Knight is now very deep in Black's territory. Black tries to break White’s pawn structure with 15... bxc3.
Instead of taking back, White makes a bold move: 16. Bc4! This ignores the pawn and goes straight for an attack on the Black Queen and the weak f7-pawn near the King. Black counters by attacking White’s Queen with 16... Nxd4. This is a very complicated moment! White moves the Queen back safely to 17. Qf1. Now, Black must deal with the threat to their own King. Black trades Knights with 17... Nxf3+, and White recaptures with 18. gxf3.
White’s pawns are a bit messy now, but the pieces are very aggressive. Black moves the Queen to 18... Qc5, but White ignores the danger and strikes with 19. Bxf7+. White has broken into the King’s castle! The Black King hides in the corner with 19... Kh8.
Total Pressure
White plays 20. b4, distracting the Black Queen. After 20... Qb6, White pushes again with 21. a5. White is using the pawns like a fence to push Black’s pieces away from the defense. Black moves to 21... Qb5. White brings the Bishop back into the action with 22. Bc4. The Bishop is a hero in this game, constantly switching between attack and defense.
Black captures a pawn with 22... Qxb4, but this move takes the Queen away from the King's defense. White seizes the chance and swings the Queen over with 23. Qh3. This move creates a scary threat against the Black King. Black tries to block with 23... Nh5.
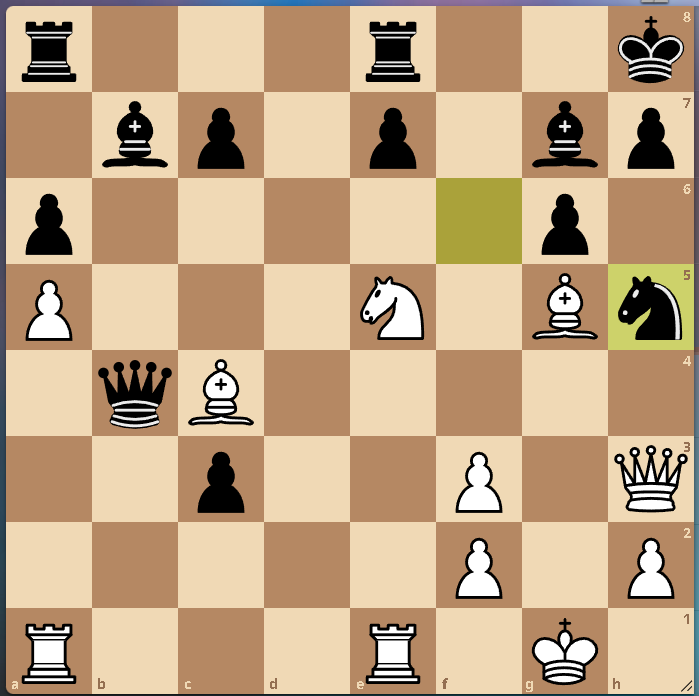
Diagram 2 – Total Pressure
The Final Blows
White begins a forcing sequence with 24. Nf7+. The King must move back to 24... Kg8. Now White plays 25. Qe6. This move creates a "discovered attack" threat. If White moves the Knight, the Queen will be attacking the King. Black tries to create some room with 25... h6, but it is too late.
White jumps back with 26. Ne5+, checking the King. The King returns to the corner with 26... Kh8. White captures a key pawn with 27. Qxg6. Black is running out of moves and tries 27... Bxf3 to create a distraction. White ignores it and brings the Bishop to the center with 28. Bd3. This move threatens checkmate on the next turn!
Black tries to run with 28... Kg8, but White keeps the pressure on with 29. Qh7+. The King moves to 29... Kf8. Finally, White plays 30. Nd7+. Black resigns because mate is unavoidable. A brutal attack where every white piece joined the party!